Showing posts with label DIY. Show all posts

Sunday, January 6, 2013

DIY baby blanket

Well it's setting in that in 12 weeks we will be a family of 4. Up until this weekend I haven't bought or done one thing to prep for our new arrival.
After being inspired by Pinterest I decided to give my sewing skills a go at a cozy baby blanket. The tutorial I used is here:
http://www.howdoesshe.com/designer-print-and-minky-baby-blanket/

The only mishap I ran into was the cozy fleece is stretchier than the cotton so I ended up with a bit too much fabric at my final corner. Oh well, I def won't be quitting my day job!
But for $16 and an awesome color scheme combo I'm happy I made this number for baby B!


Sunday, November 18, 2012

DIY wreath for under $1.00

I love wreaths but not for the costs they're sold for at the craft stores. After much pinning on Pinterest I decided to give it a go. For under $1.00 if it went wrong it wouldn't be a big loss.
Instead of buying a wreath frame I cut out the center of a large paper plate that I already had.
Next I purchased 4 pieces of craft paper on sale at hobby lobby for .88 total. I chose a basic striped paper so it's not entirely festive but will fit in nicely once we get our holiday decor is up.
I created my own leaf shaped stencil from an old cereal box and cut and traced 60 leaves.
Then I pinched and glued the tips of each leaf 60 times.
Next I glued and arranged the leaves along my wreath frame (aka paper plate). The only pattern needed was keeping them all in the same direction as you make your way around the frame.
I really liked how it looked but decided to add some texture of a sage colored burlap that I already had on hand. I only cut out about 10 burlap leafs and placed them randomly on the wreath.
To bring a more holiday feel to the wreath I tied a pinecone to hang in the center. The pinecones here in Colorado are easy to find so I had a collection of them already.


I think I will continue to change out the wreaths for each season and use the blue canvas to hang it. I used some twine to let it hang in the canvas. I like the natural fibers and texture of the twine but you could also used ribbon.


I added a holiday glitter snowflake to the wreath just for Xmas.

cheers, Carri

Monday, July 23, 2012

DIY necklace

If you've not seen this on pinterest you must have been under a rock.
BC this necklace is everywhere and I had to make one for myself.
I had a chain and silver beads on hand.
I just purchased the plastic chandelier crytals from my trusty Michael's.


Next up I painted them with OPI nailpolish. 2 coats to be exact on each side.


Next up I assemebled my necklace similar to this one only with one strand:

I chose no ribbon for the necklace since I had a chain on hand.

My Version above

awesome tutorial here:

bc of this nail polish painting necklace tutorial I've taken to painting
some drab brown bead necklace too. Super cute and easy way to change up something old.
Enjoy!

(sorry crappy cell phone pic)
Cheers, Carri

DIY candles?

Ok, so it wasn't my idea.
But for years now Evan has been telling me he wants to make candles with left over candle wax.
So I finally listened and bought him his candle making supplies @ Michael's.
And WOW it was super easy, cheap, and a healthy alternative to the chemical filled
store bought candles.
I purchased the following:


I had some lavendar oil on hand for scent:
We used left over jars from old candles.
I started by popping out the old wick from the existing jar.
filled up the jar with soy wax chips,
melted in microwave in small increments of time to not over cook it.
Once wax was melted I added my new wick to the center of jar
placed in freezer to set and viola.
I added only a touch of lavender to the candle bc I was using
some existing scented wax from the old candle.
I didn't want to make it too powerful in scent.
The box of soy wax was $8.99 @ Michaels and makes serveral candles
depending on the size of your jars.
Keep your eye out for 40% off coupons @ Michaels to get the cost down too!
Happy candle making!


Cheers, Carri

Saturday, July 7, 2012

Trash becomes Treasure

They always say: "one mans trash is another mans treasure!"
and boy are they right.
As I pulled out of my house today I saw someone had left a wicker loveseat and 2 chairs out on the curb.
I decided if it was there when I got home it was mine!
And so it was meant to be.
Yes, it needs some TLC but nothing a lil elbow grease can't deal with!
here is an image of a much nicer set but its similar to mine:
I power washed it off and am ready to spray paint it dark brown (to match our existing patio furniture)
and then make a seat cushion. 
I was so bummed I got quite a steal on a pier one love seat cushion today for $25.
It was mismarked on the price and should have been $90 so I jumped on taking it home with me.
Only to discover its just too big for our loveseat:(
So back it goes and therefore I will have to make our cushion since its an odd size.
But I think I found the best fabric for it.
Richloom Solarium Outdoor Maxfield Sand
and then get some fun contrasting colored pillows to throw in.
I'm excited to get this done as we currently don't have a comfy seating area out back.
And on a whim I decided on this $6 chevron fabric to make new curtains for the LR:
Premier Prints ZigZag Twill Storm
this is my inspiration:
Chevron Curtains
chevron stripe curtains
this is crate and barrels version of the same curtain for $99 (yeah right)
TeramoCurtainPanelF11
I got my 6 yards of fabric for $29!!
I'll make a throw pillow or two to tie it all together.
The curtains we have now are ready to be retired.
The best part about fabric.com is free shipping on returns, no questions asked!
Ok must stop shopping,
but sometimes you just get the urge to update change things up at your house
and so I decided on a new duvet cover from Urban Outfitters.
When I was in the store recently they had a gray chevron with floral print that I loved,
but not in the right size.
Yes, I have an obsession with Chevron can you tell?
So I opted for this $40 option instead.

Can't beat that price!

Cheers, Carri

Wednesday, February 15, 2012

Dictionary art on an old shoe box lid-DIY

I'm still trying to figure out the decor for the front table, so tonight I decided to do a free project printing a picture of a butterfly on an old dictionary page I had on hand. I swear that dictionary set I got at the good will for $3 has been such a great investment for me and my many projects.  I googled Images of FREE printable vintage butterfly's, printed it at home on our color printer on the dictionary page.  I didn't have any canvas on hand but i did have an old shoe box lid on hand. I glued the printout on top of the shoe box lid and painted the edges gray. I made sure to paint onto the edges of the print out to make it better blend on to the canvas, aka shoe box lid.

Tuesday, February 7, 2012

DIY artwork and Valentines

I really needed one last piece for my collage of pics by our front entry table. I ran out of canvases and decided to use a shoe box lid instead.  I printed this butterfly picture on a page from an old dictionary, glued to my shoe box and painted the edges gray. Easy and free, yes please!


Tonight we also worked on our Valentines and I made a test batch of kiss pies! Super easy and yummy

1pie crust
1 bag kisses
1 egg
1 tbs sugar
bake 350
I used a big glass to make my circles, then cut out with knife. Fold the circle around the kisses like mini fortune cookies. Brush tops with egg and sprinkle with sugar. 
Bake 28 mins 
yummo


Cheers, Carri

Sunday, January 22, 2012

DIY chocolate syrup

Chocolate milk has become Cade's fav night time routine.  He knows how to open the fridge now and likes to get it out, and then pour the syrup into the milk and then shake it. So we've gone through what was left of our chocolate syrup. We call this his special night time treat! I decided to make our own syrup last night. -I got this recipe from another blog and shared below. This was very easy took all of 5 minutes and we had everything already in stock. I used the existing empty chocolate syrup bottle and this recipe filled it entirely! Try it out.

Homemade Chocolate Syrup

1 1/2 cups sugar
3/4 cup unsweetened cocoa powder (I use Ghirardelli)
1 cup water
dash of salt
1 teaspoon vanilla

In a small saucepan, add sugar, cocoa, and salt.  Whisk together gently.  Add water.  Bring mixture to a boil, stirring occasionally.  Reduce heat and cook 1 minute.  Remove from heat and add vanilla.  Cool.  Store in the refrigerator. 

For delicious chocolate milk, add 2 tablespoons chocolate syrup to 8 oz. of milk.  Heat for hot chocolate.

For milk shakes, combine 1 cup cold milk, 1/4 cup chocolate syrup and 2 cups (1 pint) of vanilla ice cream to a blender.  Blend.

This syrup would also make a delicious dessert garnish or ice cream topping.

Recipe source- Better Homes and Gardens New Cookbook, 1968.

Cheers, Carri

Tuesday, January 17, 2012

25 uses for Borax article

Remember the laundry detergent I made recently and the other safe household cleaners?? Well I found this article on diylife.com about 25 uses for this all natural non toxic agent.
http://www.diylife.com/2010/08/25/borax/

Check it!

Sunday, January 15, 2012

DIY household cleaners that are SAFE

Today Caders wasn't feeling too hot, I think he has a cold. So he napped longer than usual which left me with lots of time. I tried to work on my sewing, FAIL. And decided to embark on making some DIY household cleaners that are safe.  I had some left over windex and household cleaner bottles on hand and decided to reuse those.
I followed these recipes for my cleaners.

All-Purpose Cleaner (recipe from care2.com)
I use this all-purpose cleaner for everything: cooked-on messes on the stove, counter tops, crayon marks and grimy fingerprints on my walls, and a great no-rinse mop solution. You may need to give it a little time to work on particularly crusty, caked-on messes. In that case, I usually spray the mess generously, go do something else for a couple of minutes and come back to wipe up the mess. This solution is particularly effective when used with a microfiber cloth.
1/2 teaspoon washing soda
A dab of liquid soap
2 cups hot tap water
Optional: a few drops of your favorite essential oil(s). 
Combine the ingredients in a spray bottle and shake until the washing soda has dissolved. Apply and wipe off with a sponge or rag.


Glass Cleaner (recipe from care2.com)1/4-1/2 teaspoon liquid detergent
3 tablespoons vinegar
2 cups water
Spray bottle

Put all the ingredients into a spray bottle, shake it up a bit, and use as you would a commercial brand. The soap in this recipe is important. It cuts the wax residue from the commercial brands you might have used in the past. Microfiber cloths are a great, lint-free, low-waste way to wash your windows/mirrors. Newspaper also works really well.
happy green cleaning!!

Don't forget you can also make your own DIY Febreeze! My mom recently went to the store for us and bought a ton of Febreeze so I don't need to make any yet. 


Here's what you'll need to whip up a batch:    
  • an empty spray bottle
  • 1 1/2 cups water
  • 1 tablespoon baking soda
  • 1 to 2 tablespoons of fabric softener  

Cheers, Carri

I got myself a lil gift!

Super excited about my new lil gift to myself. I found this baby on Craigslist for $45.  Its regularly priced at $100 and it was only used a few times. Has all the pieces and manual and I am so excited to get working on it. My mom had her old Kenmore sewing machine that is about 100lbs and all metal heavy duty machine. Bless her heart she had it tuned up for me about a year ago and the bottom stitching has never worked right. It makes a mangled mess of thread and has just never worked for me. Plus being that its so old with no manual its not as user friendly as some of the newer machines.  I hated having to tell her I was going to buy a new machine since she want to all that trouble to one save the machine this many years, and two get it all tuned up for me. But I think she understood. So we went to check this machine out together on Saturday and I snatched it up. 
Now what to sew.....I have a few things in mind:
I have some khaki work pants that are wide leg and while that was in style once they just look too horribly BIG on me. I think my body shape has changed too so I'm not loving how they fit me anymore.  I think I will attempt this.
And also how to make some skinny jeans bc lets face it they are hard to find for my body shape.I have a wide tummy area (:(boo) and short legs, and wide thighs so those skinnies just don't come in my shape.
But I have some existing jeans that are boot cut, older and if I screw up won't be too sad that I ruined the pants, but I think this sounds easy enough.

Cade has some adorable GAP jeans that have holes in the knees so I thought about fixing them up like such-except I will keep the length and not make them into shorts.


Oh if only I had a lil girl....I have some friends with lil girls so perhaps these will make cute Bday gifts for them. So cute and sounds simple enough for me!


Super exited to get started but nervous too.....bc lets face it I really do not know what I'm doing.  Too many projects not  enough time!

Cheers, Carri

Saturday, January 7, 2012

DIY Liquid laundry detergent

I've read over several diff DIY laundry detergent methods....not loving any of the liquid ones until I saw this one. All of the other one's I read up on seemed to have so many steps and then made such a HUGE supply I had no way of making that much or storing that much.  That is until I stumbled upon this site:
http://deskstovetablecounter.blogspot.com/2012/01/super-thrifty-liquid-laundry-detergent.html

So I bought the necessary ingredients and decided to add fabric softener to ours for extra scent and softness. I am a sucker for scented clean clothes!

1/3 bar of Fels Naphtha, 5.5 ounce bar. 
1/2 cup of washing soda
1/2 cup of borax powder
2 Gallon jugs, recycled vinegar jugs are great.
 
Grate the soap and put it into a large saucepan with 8 cups of water over med. heat. Heat the mix until soap melts.
Add washing soda and borax. Stir constantly until dissolved. Let it sit for 5 minutes over the heat stirring occasionally.
Remove from heat and let sit another 5 min.
Use a funnel and put 1/2 of the mixture into each gallon jug. Fill each jug 1/2 way with hot water and shake well.
Fill the jugs all the way with hot water, and shake again. let sit for 24 hours. This gels up and looks like egg whites.
use 1/4 to 1/3 cup per load.


I had some left over detergent plastic bottles that I recycled and filled. I used the top of the lid to measure my detergent.  
I saw another great post on powder detergent but its a HUGE supply so maybe if I cut it into half that will work. I want to try both powder and liquid to see which I like better. Typically I like liquid detergent best but I will see soon enough. Lets see how long this liquid lasts me. 
The website says based on the cost of the ingredients it runs about 2cents per load! I don't think any name brand or even generic brand can beat that price. I think even a generic brand is say $5 and does 32 loads that is .15 cents per load.
Score!
Borax: $4.79 for a 5lb box, I used only 1/2 cup and this is an all purpose cleaner too!
Baking wash $4.59 again a 5lb box, I only used 1/2 cup this will last forever!
Soap: $1.25 I only used half the bar
TOTAL: 10.63 but this will make me a lot of detergent, more than what I would pay 10.63 for.

DIY christmas bows or bows for anything

This year we went sentimental and made some of our Xmas gift bows. Super cute and the grandparents LOVED it! Plus you can re-use for bday gifts or anything.
Super easy and Cade loved helping on this project.  he colored on the construction paper and I cut and glued the bow pieces together:
http://howaboutorange.blogspot.com/2009/10/make-gift-bow-from-magazine-page.html


Tuesday, January 3, 2012

Recovering a chair DIY style

When I was first pregnant with Cade back in 2008 we opted to not find out the sex. So planning a gender neutral nursery was not very exciting to me. I knew I wanted a versatile chair that could be used in our home down the road and def not a glider style chair. Afterall I did luck out and have a precious baby boy who didn't really require a ton of rocking to be put to sleep!
I found this baby at the Goodwill on a 50% off day and got it for $12.

I decided to recover it in this fabric, LOVE:


Yes, maybe its a bit girly but I have spurced up the room with some things that make it all boy!
It was a hellacious project that if I had to do again I probably wouldn't.  Especially now having a baby I wouldn't have the time. 
But I do love how it turned out:


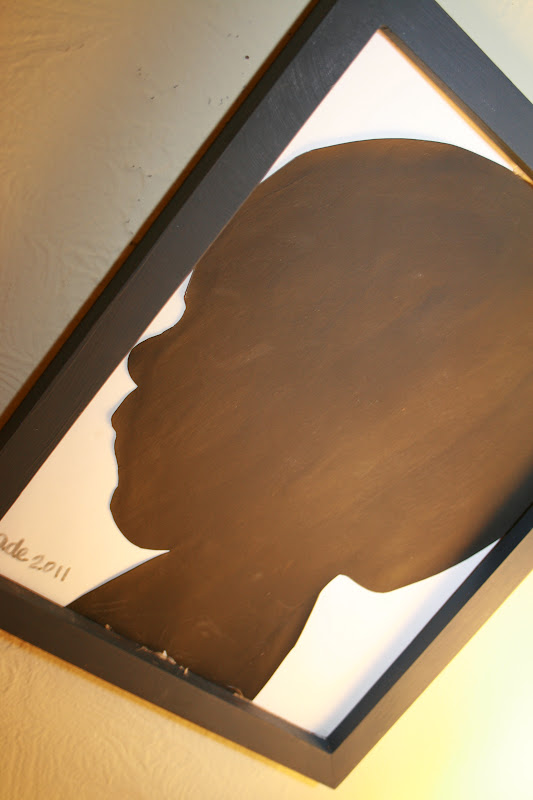
DIY silhouette picture

I have really been wanting to make a Silhouette picture of Cade for our front entry (collage of pics).
I took a side profile pic of my baby, printed it at home on cardstock. Cut out the pic painted it black and then glued it to an old Xmas box that was white. Then I placed the white cut out into an existing frame I had on hand and hung it up. Super easy and free if you happen to have those things on hand. Cade's head is pretty large so it didn't all make it into the frame but the important part is his cut button nose and lips profile fit! I also took a silver maker and wrote Cade 2011 in the corner. Great idea to add to your decor. Sorry for the crappy pics they are from my iphone at night with no flash.


This is what the front entry wall looks like now, I am constantly changing it up...


This is the actual pic of Cade that I used to make my silhouette.


Monday, October 10, 2011

DIY Mod Podge, my fav!

As you know Mod Podge is my fav to add to any craft to protect it. So when I recently found out the secret receipe I was excited!! ha ha super secret recipe done easy:

50% 50% Elmers - water , amazing!
I guess thinking about the "secret recipe"its not exactly that genius. Makes sense actually.  I'm def giving this ago.

Saturday, October 8, 2011

How to dress up any ol' rug by painting it!

I decided I was over my plan brown throw rug by our back door. It was okay but just drab. I decided to use some painters tape to make some stripes and then paint it. As I began I realized it was going to soak up a bunch of my acrylic paint. I had enough to make one stripe butter cream, and the other slate gray.
BEFORE:

taped:


butter cream stripe


both stripes:


ta-dah, much better!


I just used an old wide foam brush to do this. I wasn't entirely worried about getting the paint into each woven  groove bc it looks more rustic this way. Super easy, took me about 10 minutes.